
lodge™ Solar Speaker 4 Series 2
Set-up, Use & Care Guidelines

Thank you for purchasing the lodge solar speaker 4 series-2! This page will help you set-up and connect your speaker for maximum enjoyment.
PRODUCT SETUP
1
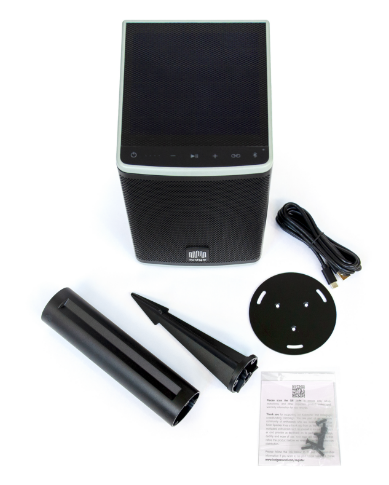
What's in the box
- Customer "Thank You" card
- Speaker
- USB-C cable
- 2-piece in-ground stake and metal plate
- Plastic bag with screws to assemble in-ground stake and secure speaker to the metal plate
1
What's in the box
- Customer "Thank You" card
- Speaker
- USB-C cable
- 2-piece in-ground stake and metal plate
- Plastic bag with screws to assemble in-ground stake and secure speaker to the metal plate
2
The lodgeCONNECT™ App
- Search for "lodge sound" to find our app on the Apple App Store for iOS devices or on the Google Play Store for Android devices.
- The app is called "Lodge Sound App"
- Currently, the app will allow you to perform the following basic function:
• Over-the-air firmware updates for single and multiple speaker configurations
We plan to make improvements to the app and add new features/services. We will announce these enhancements when they are implemented.
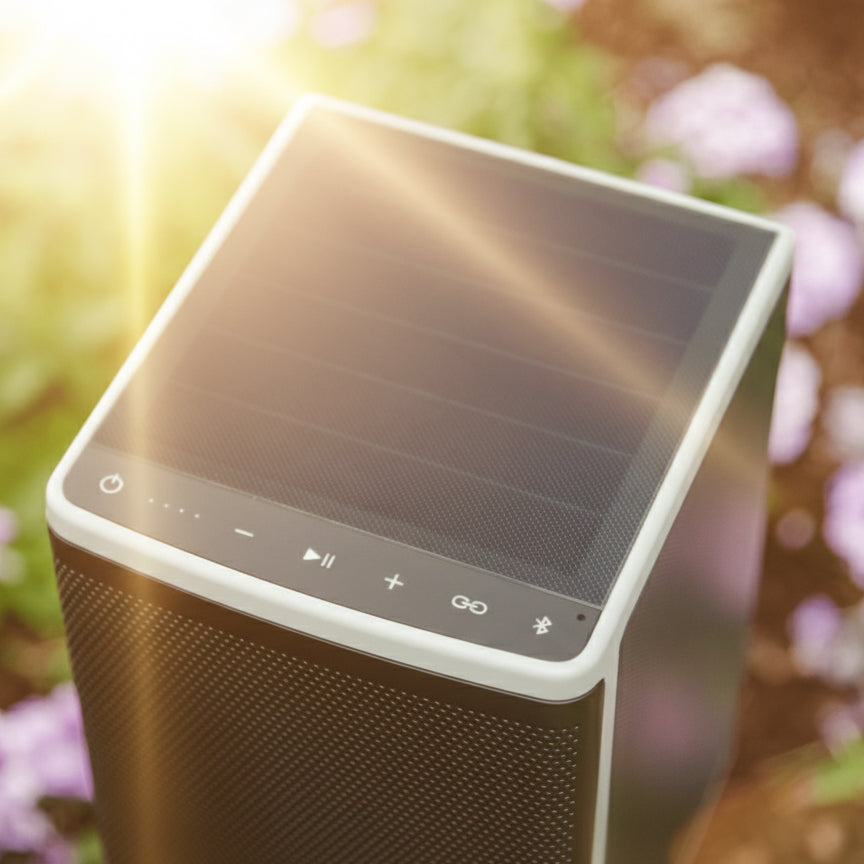
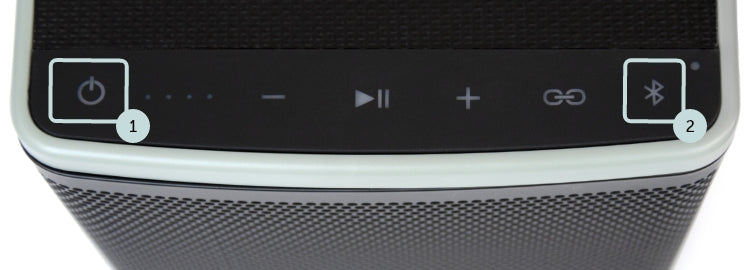
3
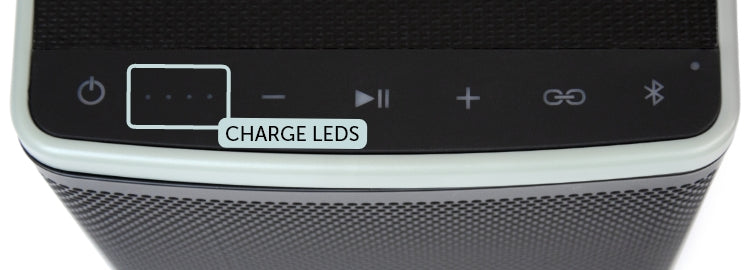
Speaker control panel
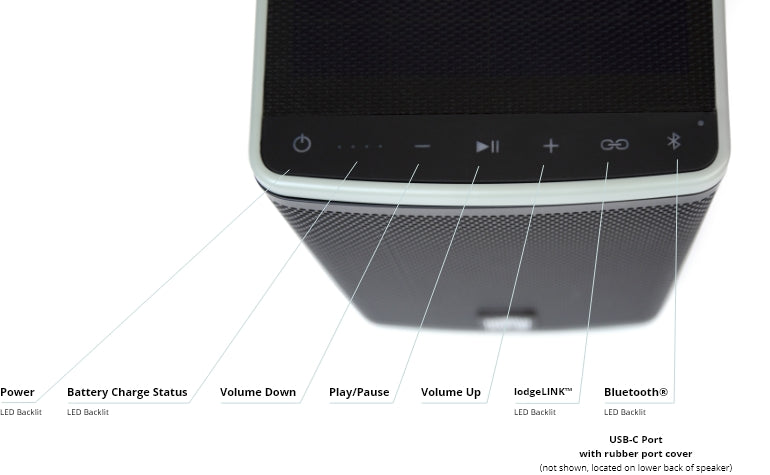
3
Speaker control panel
INSTALLATION
1
Finding the right location
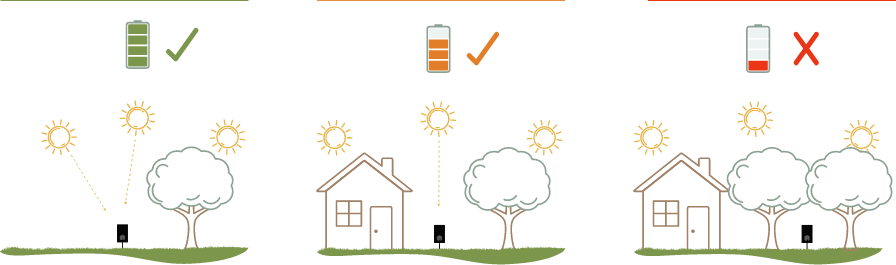
Find the right location in your backyard for the stake. Select a location that will allow the speaker to be exposed to direct sunlight so it can always be charging (see image for location options & the potential impact to charging time). Partial sun/shade will reduce your speaker's charge and runtime.
1
Finding the right location
Find the right location in your backyard for the stake. Select a location that will allow the speaker to be exposed to direct sunlight so it can always be charging (see image for location options & the potential impact to charging time). Partial sun/shade will reduce your speaker's charge and runtime.
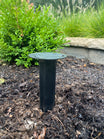
2
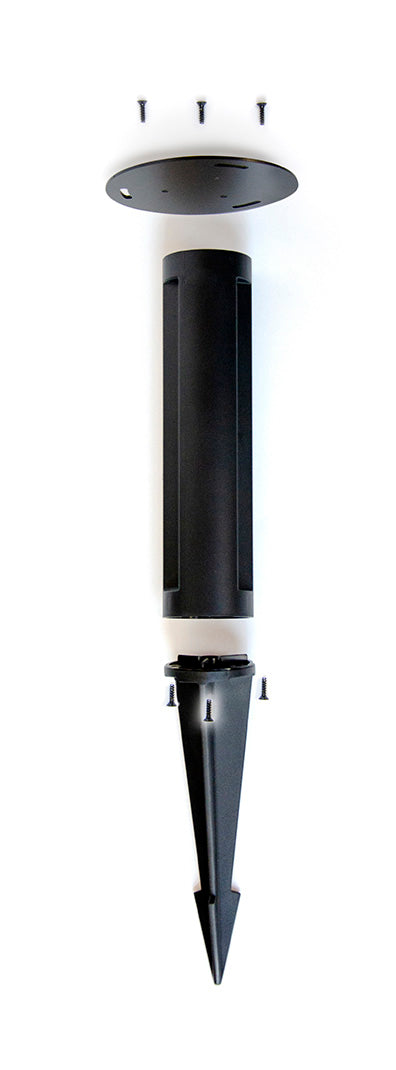
Installing with the speaker stake
The stake comes in two pieces. Use the included screws to connect the two pieces of the stake (do not over-tighten the screws).
- Attach the circular metal plate to the top of the speaker stake, using the supplied screws. Now the stake is ready to be installed in ground at the location you have selected. Taking care not to bend the metal plate, drive the stake into the ground until secure, using a rubber mallet or similar tool (caution: make sure the area you selected to install the stake does not have buried cables, wires, irrigation pipes, etc.).
- Place the speaker on top of the stake. The bottom of the speaker has powerful mini-magnets that firmly attach the speaker to the metal plate on top of the stake. The speaker remains secure on top of the stake under everyday, normal conditions. For additional security and a permanent installation, you can use the supplied thumbscrew to secure the speaker to the plate.
2
Installing with the speaker stake
The stake comes in two pieces. Use the included screws to connect the two pieces of the stake (do not over-tighten the screws).
- Attach the circular metal plate to the top of the speaker stake, using the supplied screws. Now the stake is ready to be installed in ground at the location you have selected. Taking care not to bend the metal plate, drive the stake into the ground until secure, using a rubber mallet or similar tool (caution: make sure the area you selected to install the stake does not have buried cables, wires, irrigation pipes, etc.).
- Place the speaker on top of the stake. The bottom of the speaker has powerful mini-magnets that firmly attach the speaker to the metal plate on top of the stake. The speaker remains secure on top of the stake under everyday, normal conditions. For additional security and a permanent installation, you can use the supplied thumbscrew to secure the speaker to the plate.
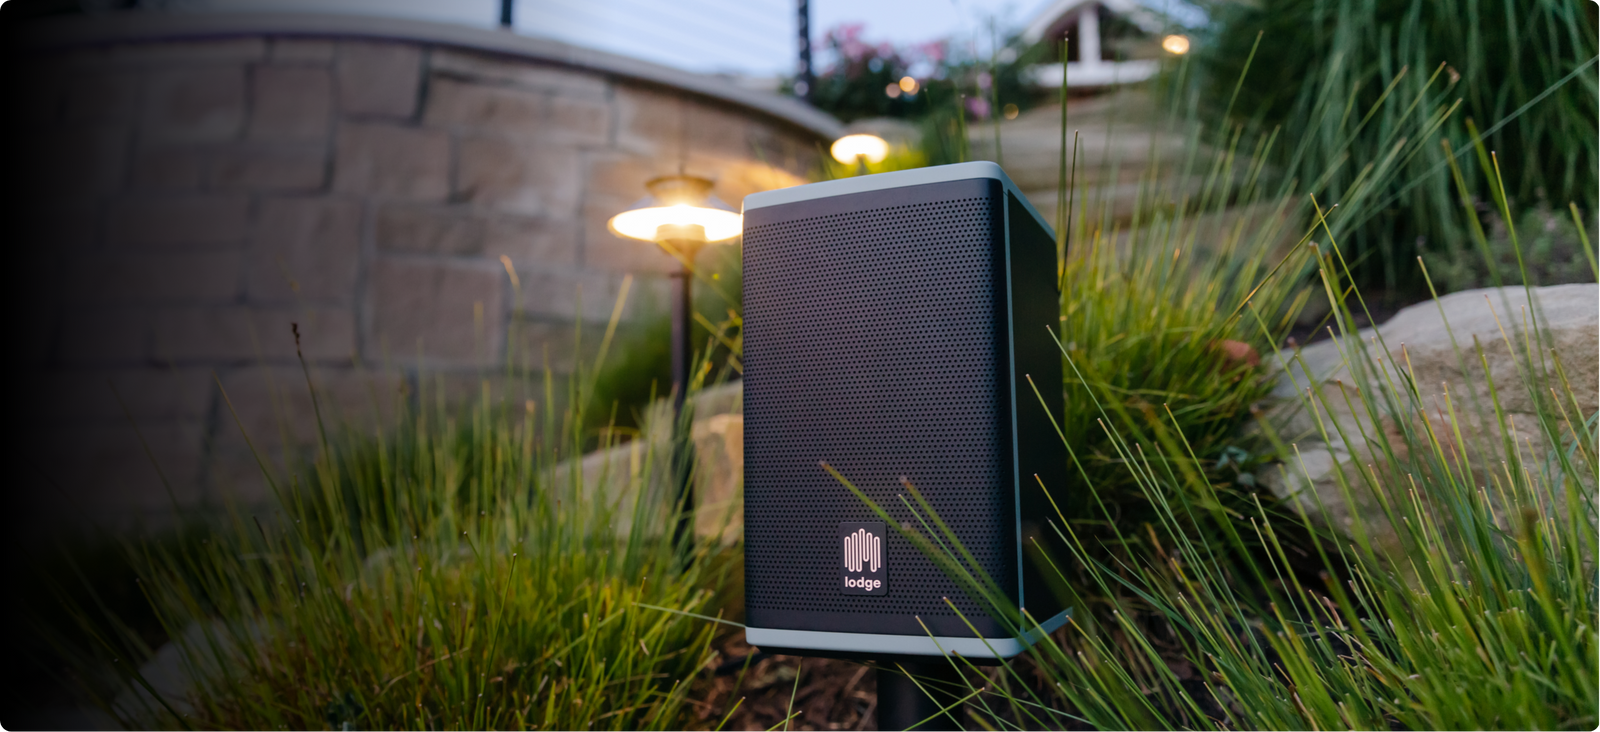
USING IT AROUND THE BACKYARD
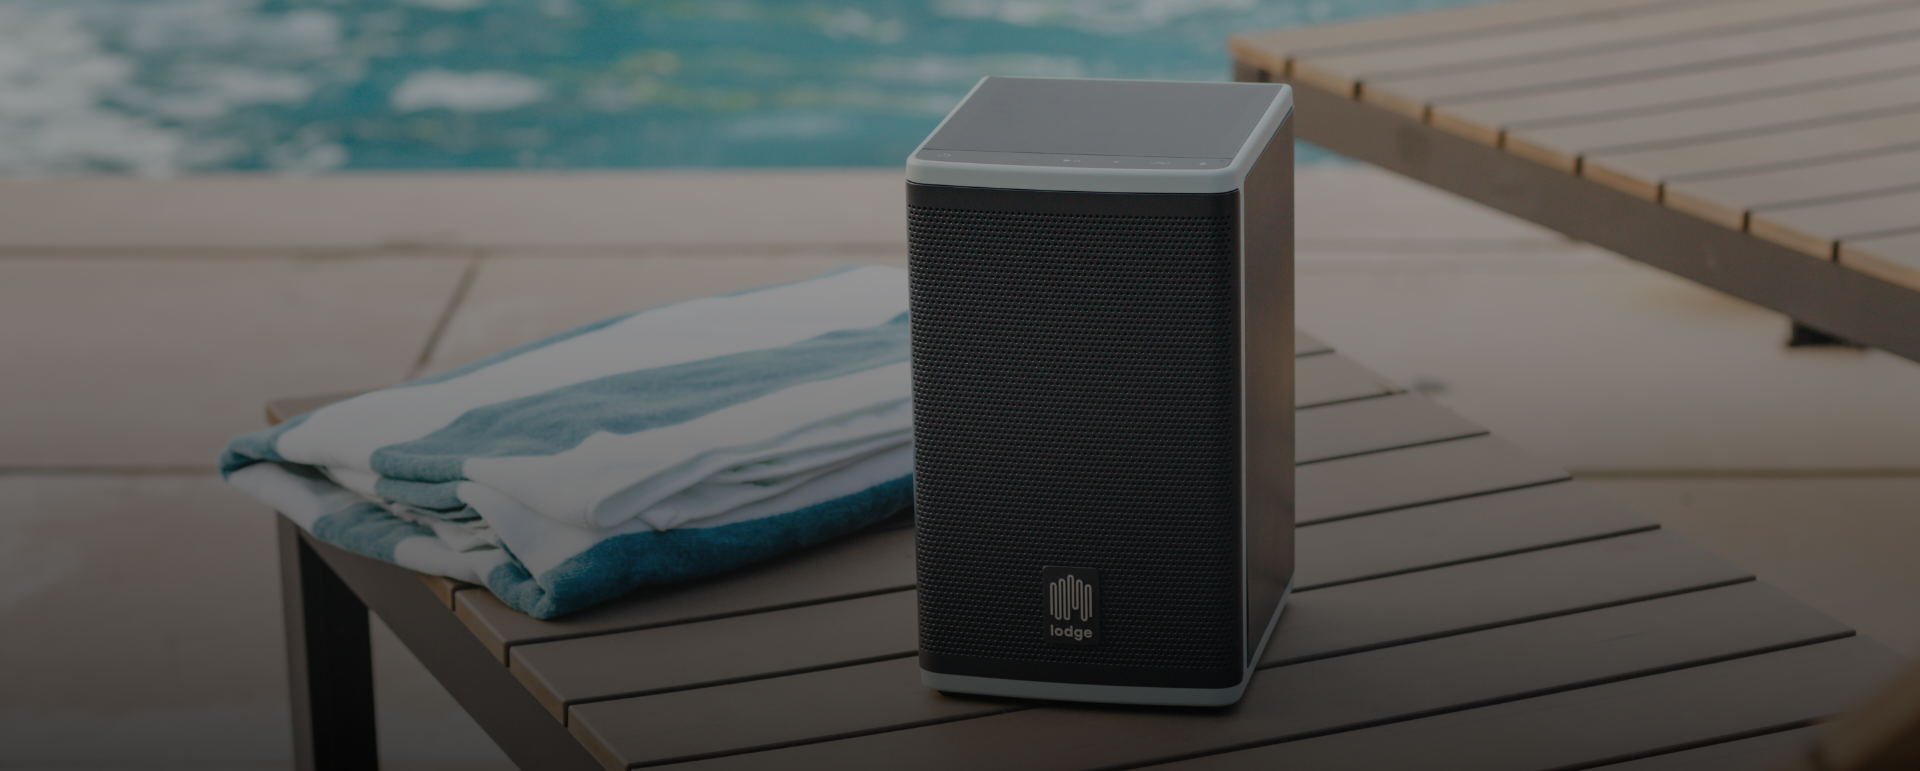
The speaker can be used in multiple ways around the backyard. It can be installed in-ground using the provided stake (installation instructions provided above). Additional stakes can be placed in different areas of your backyard to make it easier to move your speaker(s) from one location to another—whether it's from the patio to the grill area or over to the pool. Or simply use it as a free-standing portable speaker! Just ensure the speaker is on a flat surface, catching ample sunlight for continuous charging, enhancing your outdoor entertainment experience.
CHARGING
1
Charging status of the speaker when taking it out of the box for the first time
- The speaker is shipped with a charge. When you take the speaker out of the box, it should have at least 75% charge (3 LEDs on the user panel should be lit when you turn it on). It is ready to connect and play!
- If you want the speaker to be 100% charged, simply set the speaker outside in the sun. The solar panels will start capturing the sun’s energy to charge the battery to 100% full status.
2
Charging the speaker using sunlight
- When the speaker is outside, the 4 solar panels (3 sides and top) will constantly charge the battery by capturing energy from the sun.
- The speaker is charging when exposed to sunlight regardless of whether it is "on" or "off".
- With the power on, the LED lights will flash white while charging (each light equals 25% charge). When fully charged all 4 LED lights will be on and show a steady white glow.
- With the power off, the LED lights will not be on, but the speaker will still be charging when exposed to sunlight.
- Once fully charged, as long as the speaker is outside and capturing energy from the sun, it will stay charged. For every hour of sunlight the speaker is exposed to, it can accumulate charge to provide 2-3 hours of average play time (keep in mind that the location of the speaker, the weather conditions, direct or indirect exposure to sunlight all can impact the rate at which the speaker charges and stays charged).
- Using the speaker in the evening or when there is little to no sun exposure, a fully charged speaker will provide between 15-30 hours of continuous play time. Battery performance will vary depending on the type of music played and the volume at which it is played.
CONNECTING / DISCONNECTING
1
Connecting a device to the speaker for the first time
- On the left side of the speaker control panel, press the power button (press and hold the button for 1-2 seconds) – the power button will light up. The battery charge status LED lights will come on. Additionally, the lodgeLINK button and the Bluetooth button will light up. You will hear a "welcome" voice prompt.
- On the right side of the speaker control panel, find and press the Bluetooth button (this is a quick press and release). The Bluetooth symbol will be flashing indicating that it is looking to pair with a device. You will hear a voice prompt saying ‘pairing’.
- On your device, find your Bluetooth settings and confirm that Bluetooth is on
- Search for Lodge Audio under Bluetooth
- Select Lodge Audio on your device
- When connected, you will hear an audible confirmation, ‘Connected’.
- The Bluetooth button light will be solid white and you will hear ‘Connected’ as a voice prompt
- Select the audio source on your device that you want to play through the speaker (Apple Music, Spotify, etc.)
- To turn volume up, press and hold the + button
- To turn volume down, press and hold the – button
- To play or pause the content, press the play/pause button on the control panel.
2
Connecting additional speakers
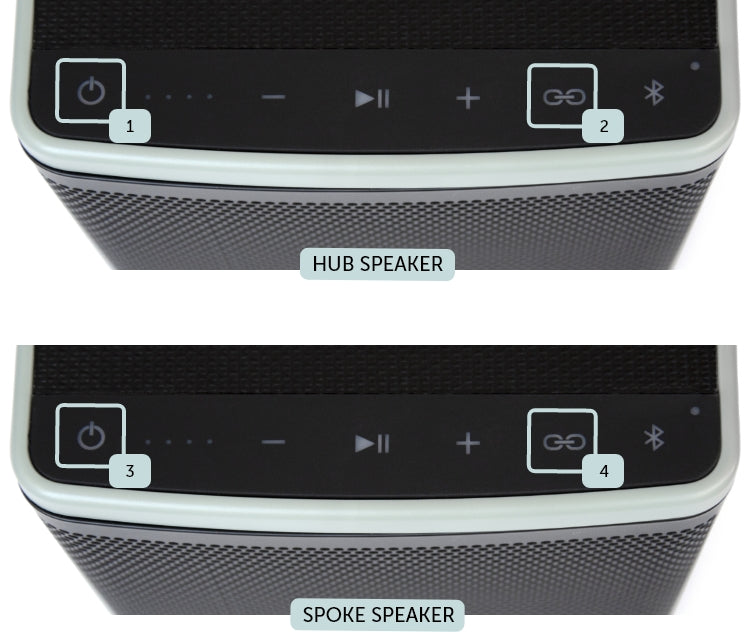
You can connect an unlimited number of speakers together (provided they are within the lodgeLINK™ broadcast range). This is commonly referred to as party mode. Playing multiple speakers connected together provides an immersive soundscape throughout your backyard. Multiple speakers get connected to one another in a "hub & spoke" configuration. The main speaker (the first one you connect to your device) is the "hub" speaker. All additional speakers are designated "spoke" speakers and get connected to the main (hub) speaker.
To connect additional speaker(s):
- Turn on the speaker that will be the "hub" speaker.
- Confirm that it is connected to the device you will be using. If you previously connected this device to the speaker, search for Lodge audio under Bluetooth on your device and connect. If this is the first time you are connecting the speaker to your device, follow the steps under "connecting your speaker for the first time" above.
- Press the lodgeLINK™ button (quick press) on the control panel of the speaker (hub) connected to your device. The lodgeLINK™ button will light up and provide audible confirmation "Entering LodgeLink mode," indicating that it is ready to link with another speaker.
- Turn on the additional "spoke" speaker.
- Press the lodgeLINK™ button (quick press) on the additional speaker. The lodgeLINK™ button will light up and you will hear the audible confirmation "Entering lodgeLink mode." The link buttons on both the main (hub) speaker and the additional (spoke) speaker will show a steady white glow.
- Add more speakers using steps 1-4 above.
- Getting out of lodgeLINK™: Press the lodgeLINK™ button on the speaker and you will hear "Leaving lodgeLink mode."
2
Connecting additional speakers
You can connect an unlimited number of speakers together (provided they are within the lodgeLINK™ broadcast range). This is commonly referred to as party mode. Playing multiple speakers connected together provides an immersive soundscape throughout your backyard. Multiple speakers get connected to one another in a "hub & spoke" configuration. The main speaker (the first one you connect to your device) is the "hub" speaker. All additional speakers are designated "spoke" speakers and get connected to the main (hub) speaker.
To connect additional speaker(s):
- Turn on the speaker that will be the "hub" speaker.
- Confirm that it is connected to the device you will be using. If you previously connected this device to the speaker, search for Lodge audio under Bluetooth on your device and connect. If this is the first time you are connecting the speaker to your device, follow the steps under "connecting your speaker for the first time" above.
- Press the lodgeLINK™ button (quick press) on the control panel of the speaker (hub) connected to your device. The lodgeLINK™ button will light up and provide audible confirmation "Entering LodgeLink mode," indicating that it is ready to link with another speaker.
- Turn on the additional "spoke" speaker.
- Press the lodgeLINK™ button (quick press) on the additional speaker. The lodgeLINK™ button will light up and you will hear the audible confirmation "Entering lodgeLink mode." The link buttons on both the main (hub) speaker and the additional (spoke) speaker will show a steady white glow.
- Add more speakers using steps 1-4 above.
- Getting out of lodgeLINK™: Press the lodgeLINK™ button on the speaker and you will hear "Leaving lodgeLink mode."
3
Stereo Mode
When using two speakers, you have the option to listen to them in Stereo mode (speakers are configured and dedicated as right and left speakers and play stereo content). Note: the speaker(s) are shipped in mono mode setting as the default.
Setting up stereo mode with 2 speakers:
- Identify the speaker you will designate as the ‘left’ speaker. This will serve as your hub speaker (the one connected to your device). Note: This speaker will be treated as the LEFT and hub speaker every time you engage Stereo mode.
- Confirm that it is connected to the device you will be using. If you previously connected this device to the speaker, search for Lodge audio under Bluetooth on your device and connect. If this is the first time you are connecting the speaker to your device, follow the steps under "connecting your speaker for the first time" above.
- Press the lodgeLINK button (long press of 2-3 seconds), until you hear a chime. The chime indicates that this speaker is now in stereo mode and configured as the left stereo speaker. The lodgeLINK button will be lit up and flashing very slowly.
- Identify the speaker you will designate as the ‘right’ speaker. Turn the speaker on. Press the lodgeLINK button (long press of 2-3 seconds), until you hear a chime. The chime indicates that this speaker is now in stereo mode and configured as the RIGHT speaker. The lodgeLINK button will be lit up and flashing very slowly.
- You will hear a voice prompt, ‘stereo mode activated’ come from both speakers. The speakers are now in Stereo Mode.
- To return the speakers to Mono Mode, press the lodgeLINK button (long press of 2-3 seconds) until you hear the chime. Alternatively, simply turn off the hub (left) speaker. This will turn both speakers off.
- Next time you turn the hub speaker on, you will have the option to connect and listen to just one speaker (hub), OR connect two or more speakers together in party mode using the lodgeLINK button (quick press), OR connect two speakers in STEREO mode using the lodgeLINK button (long press) as described above.
4
Activating "Bass Boost"
The lodge Solar Speaker is designed to play music as accurately as the artist intended. Some listeners prefer to hear deep bass regardless of the type of music they are listening to.
Additionally, some listeners like bass enhancement when listening to music at low volume levels. The Bass Boost feature allows the listener to accomplish that.
- Turn the speaker on. Connect it to your device using the instructions listed above.
- Do a long press on the play/pause button. You will hear a voice prompt - “Bass Boost activated”.
- Play music on the speaker and notice the enhanced bass response when listening to your favorite tracks or listening to music at low volume levels.
- To de-activitate Bass Boost, do a long press on the play/pause button. You will hear a voice prompt - “Bass Boost off”.
- You can activate Bass Boost with one speaker, or with two speakers in stereo mode or with two or more speakers in lodgeLINK mode (aka party mode). Just remember to activate Bass boost first before connecting multiple speakers together in Stereo mode or Party mode.
5
Disconnecting a mobile device
- Select Lodge on the Bluetooth device list and select disconnect, or
- Turn Bluetooth setting off on your device
Reconnecting a mobile device
- After the speaker is powered on, go to the Bluetooth setting on your device and select Lodge Audio. The voice prompt ‘connected’ will serve as confirmation that your device is reconnected to the speaker.
Additional important information
1
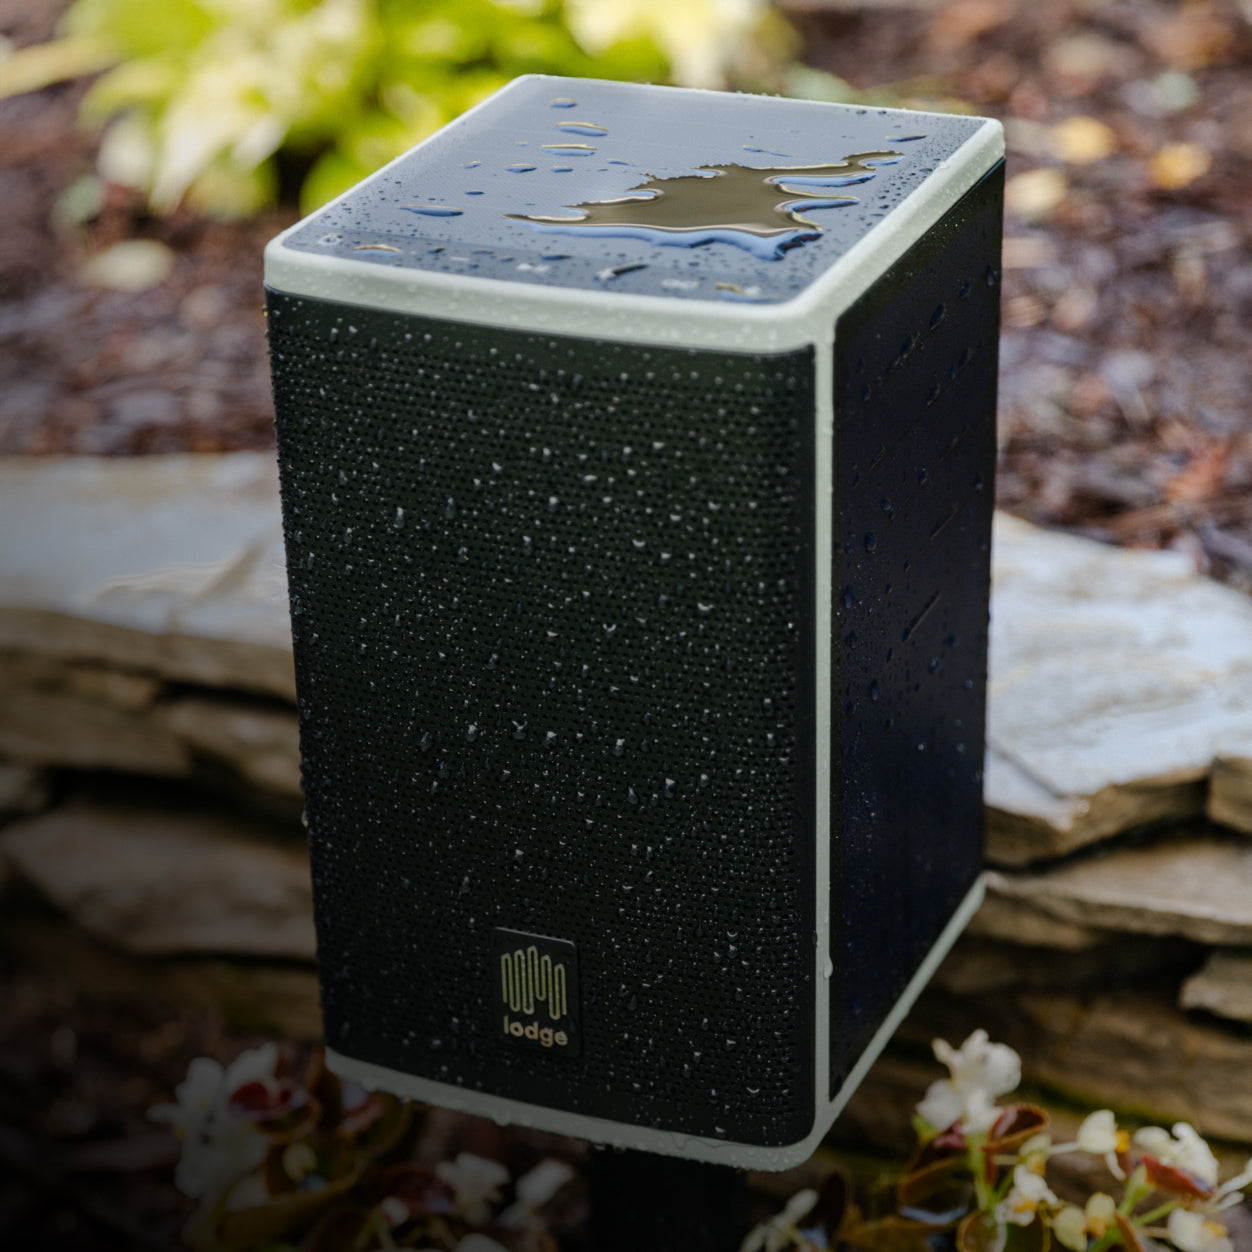
Cleaning & Care
Your speaker is splash resistant and dustproof. It is rated IP66. This means that the speaker can withstand water splashing on it from rain, sprinklers, etc. and is resistant to dust and dirt.
CAUTIONS:
- Do NOT submerge the speaker under water.
- If the speaker is exposed to salt, chlorinated water, dust or other residue, gently rinse with fresh water following the exposure to remove residue.
- Never attempt to charge the speaker using the USB-C connection while it is wet. Doing so may cause damage to the speaker.
- Keep the rubber boot (USB-C cover) on at all times when the speaker is outside.
1
Cleaning & Care
Your speaker is splash resistant and dustproof. It is rated IP66. This means that the speaker can withstand water splashing on it from rain, sprinklers, etc. and is resistant to dust and dirt.
CAUTIONS:
- Do NOT submerge the speaker under water.
- If the speaker is exposed to salt, chlorinated water, dust or other residue, gently rinse with fresh water following the exposure to remove residue.
- Never attempt to charge the speaker using the USB-C connection while it is wet. Doing so may cause damage to the speaker.
- Keep the rubber boot (USB-C cover) on at all times when the speaker is outside.
2
Resetting the speaker
- To perform a hard reset, press and hold the Power button for for 10 seconds.
2
Resetting the speaker
- To perform a hard reset, press and hold the Power button for for 10 seconds.
3
Control panel appearance
- Default – All LED lights on the control panel are off.
- Status check – Pressing any button on the control panel will light the backlit symbols (Power, lodgeLink, and Bluetooth) for 10 seconds.
- Battery charging indicator LEDs flashing – When the speaker is turned on and getting a charge from the sun or the USB-C connection, the LED’s will flash. This indicates that the speaker is charging.
NO CABLES. NO CHARGING. JUST GREAT SOUND.